The following is Rachel’s land conservation project. She did this as part of the steps necessary to be eligible for getting her HB Certification. What a fantastic use of materials to keep them out of the landfill and provide fun and interesting jumps for everyone! Way to go, Rachel!
For my land conservation project, I decided to recycle tires and turn them into new cross country jumps with my dad, for the barn we board at. The tires were gifted to us on September 1st, 2019 by Lois Pienkos, a former Timber Ridge DC – during the years 1998 and 2004. The tires were a collection of old, used, worn down tires, varying sizes and wear level. My dad and I knew we wanted to use them for new jumps for the barn at some point. I found two images with ideas that we took inspiration from.
- The pile of used tires.
- The inspiration for one jump.
- The inspiration for another jump.
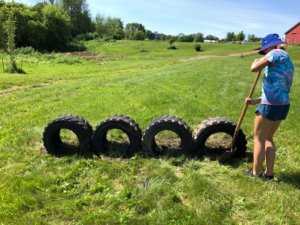
We had about 30-40 tires going into it. First, I found two spots on the property where a new jump would fit. As it is not our property, I emailed the owners of Bent Creek Farm, Barb and Curt Pooley and proposed the two spots I had found. They emailed back to me, approving my spots; both on the left side of the property, one down by the pond and the other up on the hill. On June 6th, 2020, we picked out 4 of the big tires with the most tread still on them – all four of the same brand – and loaded them into the bed  of our truck. We then drove them to the location by the pond. We dug four rectangular holes, not very deep, in a line and tested out how the tires fit in them. The spacing was difficult, to get them touching and stable and straight. Eventually we dug the correct sized holes in the correct position and had placed the tires in them. We then took the dirt that we had dug out and filled in around the tires to help stabilize them in place. We also filled the inside of the tire on the bottom side to prevent any water, animal or insect gathering. We found two wood 2x4s from an old overgrown ditch that used to be in the nearby creek. Given that the ditch was now not a ditch, we took the wood and put them as ground lines on either side of the jump. Even though the first jump was not finished, we started work on the second one. We loaded all of the remaining tires into the bed of our truck and skid loader. Then, we went to the location at the top of the hill. My dad took the skid loader – barn property – and dug out a trench for the tires to go in. After looking at the picture and the size of their tires compared to our tires, we discovered that theirs were quite a bit larger than ours and that if we did the jump, it would be at most 18” tall, and we wanted something bigger
  than that. My dad then came up with the idea to make a pyramid as we still had a lot of tires left. Not the original idea but it worked quite well because we had four big tires and two smaller tires with treads. The number of small tires and big tires worked well and we set them up (as pictured) to see how it would look and how big it would be. The next step was to take it apart and fill under the base tires and inside the base tires as well as around the outside of them and inside the small topper tire. As in the first jump, we did this to prevent water from collecting and it being a mosquito haven. After the jump was reconstructed it was automatically more stable with the weight of the dirt inside of the tires. To make sure it was stable, we put the remaining dirt around the outside and packed it into all sides. Up to this point, we had not bought anything. We reused the wood and the tires, saving them from a dumpster somewhere. However, we still
  needed the head of the dragon for the first jump and a way to make the second jump more secure. For the dragon head, months prior I had done a sketch of a basic dragon head on grid paper. My dad then blew it up to the size he wanted and did a grid by grid remake of it. He bought some plywood from Lowes and cut it out the head. He also bought maroon stain to finish it. About a week later, we brought the dragon head out to the barn in the bed of our truck and found a circular wooden post of wood to attach it to and stand it up with. We dug a hole for the post next to the left side of the jump and used a clamshell to make it as deep as we needed – about 18” to 2 feet. Using a level to make sure it was straight, we put the post in place and held it there in
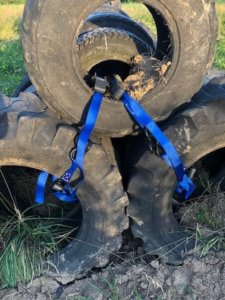
  order to screw the plywood head onto it. Once the plywood was secured against the post, we began shoveling the dirt back into the hole and around the head to secure the post in the ground. Once we were certain we had the jump secured, it was finished. Next we drove over to the second jump and used blue ratchet straps to keep the tires together and in place. We used a hula hoe, tied the straps to it and stuck it through, passing it from person to person, in order to get the straps through the middle of the tires without disassembling it. We did this through all
  three lanes of tires, twice through the top row. We connected each of the bottom row straps with one of the top row straps and tightened them. All in all, our only expenses were the ratchet straps, the plywood, and the stain for the plywood.


